Golf Articles

Check Out Our New Blogs every week!
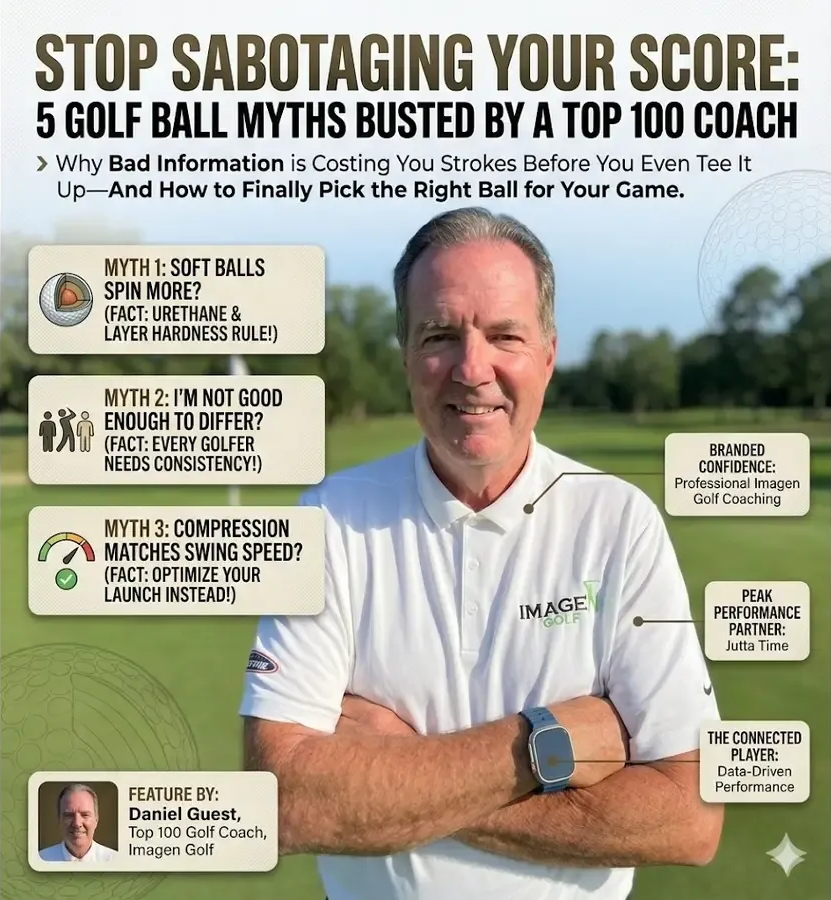
August 18, 2025
For years, you've been told to do a bunch of confusing things—like opening the clubface wide open and swiping across the ball—that just don’t work for the average golfer. It’s an old-school approach designed for old-school wedges. But at Imagen Golf, we don’t teach that. We teach the new-school bunker technique that the best players in the world are using every week to make bunker shots look easy. Players like Scottie Scheffler, Jon Rahm, and Collin Morikawa have all ditched the old rules for a simpler, more powerful way to get the ball up and down.
August 17, 2025
When we hear the word stinger in golf, the first thought that often comes to mind is Tiger Woods and his famous 2 iron stinger he rips down the fairway.This golf shot is super important to have in your skill arsenal. If you don’t carry a 2- or 3-iron, a fairway wood will achieve similar results. The concept behind the shot can also be used for punch approach shots to receptive greens, using any club down to a pitching wedge.On windy days, you can use it to maximize distance by hitting that low flying drive that stays low and runs like crazy upon landing. Meanwhile, your playing partners are watching their drives get hung up in the wind, losing 50 yards off their normal distances. So what's the secret? How do we perfect the stinger like Tiger? To hit the “stinger” you want to produce a low dynamic loft when you strike the golf ball in order to create a low launch and low spin. By default, you're used to hitting with high dynamic loft so it can make the transition a challenge at first but once you master it, you can hit this golf shot on command any time you need. How to Hit with Low Dynamic Loft To produce low dynamic loft, we want to create forward shaft lean at impact which basically means the grip of your club is ahead of the clubface when striking the golf ball. This delofts the face which helps lower the launch angle and back spin rate. In order to create a forward shaft lean at impact you'll need to change a few things during set up. 1. Start by moving the golf ball a little further back in your stance and place a little more weight on your lead side (left side for right handers). This simple adjustment in set up will set your hands forward at address and will help you produce a slight downward hit on the ball. 2. Choke down about an inch on the grip for added control. These adjustments should cause your arms and the shaft to form a “y”. Make a smooth, full backswing, and try to retain this “y” as much as possible throughout the swing. 3. Now the key to creating a low loft and square face at impact is in the lead wrist. The stinger’s low trajectory and extra roll result from the bowed wrist position at impact. To practice getting the bowed wrist feeling, simply make a swing with your lead arm, without a club. Return the hand to impact with your lead wrist “bowed” so that the logo on the glove points to the ground directly in front of the ball. This is a great “feeling” in the golf swing to help lean the shaft forward and square the face up when striking the golf ball 4. Lastly, make sure you maintain this low loft through impact and during the follow through. The mental swing thought is to hit the ball and stop. This prevents the wrists from flipping over or “releasing” after impact. Once you achieve the bowed impact, the finish flows naturally, as the trunk and arms rotate the club around to the left. Instead of causing a slice, this allows for a low, running draw. The faster the body unwinds, the farther you can hit the ball. The finish should feel very different from a normal swing where the hands turn over. To “sting” it, the wrists stay firm, and the left elbow folds down toward the ground.
August 16, 2025
#1: Choke Down the Club The first step to getting back in control when you feel like you're losing your swing mid-round is to choke down on your clubs more than normal. Shortening the stick will help you control the face more, similar to how you can hit your wedges straighter than the driver because they're a shorter club length. #2: Swing at 60% Normal Power During our golf rounds, we often start changing our tempo and speeding up our swing without realizing it. This mental tip will help you slow down a little bit by getting you to feel like you're swinging 60% of normal, but in reality, you're probably swinging 80-90% still. As we slow down our tempo and get back to a more natural rhythm, you'll see control come back into your golf swing. A good way to do this, it to take 3 swings. The first one swing as hard as you can. The second, swing very soft. Then on your third, try to swing in the middle of the previous two swing speeds.Subscribe #3: Hold the follow-through finish until you see the ball land. In basketball and in golf, the follow-through is important to keeping the shot on line. Try making your swing thought about holding the follow-through prior to swinging and it will take your mind off of what all could go wrong during the swing. It also will tell your subconscious mind to recall what the follow-through feels like. It's often the backswing or the downswing we are focused on feeling in our pre-shot routine and during our golf swing, but let's put our mind onto the follow through and focus on holding it like a statue upon finishing. Learn more about our advanced golf training to speed up your improvement!
August 15, 2025
Proper footwork, weight distribution, and weight movement are fundamentals that many players can improve if they understand and practice properly while working on their golf game indoors. Good footwork puts you in the best position to deliver the club consistently. That’s where a good friend of mine and Golf Digest Top 50 Instructor Todd Sones is teaching these days: indoors. In the winter months, Todd works out of the Buffalo Grove Dome located 45 minutes northwest of Chicago. Todd is on the Golf Academy of America’s National Advisory Board and says when you’re practicing inside, you should always wear your golf spikes. So often, Todd sees people come in to practice off the mats wearing their tennis shoes. While it’s convenient, the problem is that your tennis shoes are designed for heel-toe motion, a linear motion. Golf is a rotational motion. It’s important that you’re on your feet properly. The best players move in a circular motion. Their weight is more toward the balls of their feet at address, their knees are slightly flexed, and their lower body is engaged. As the body rotates, a good player loads the heel of the trail leg and then on the transition to the downswing, drives into the instep of the lead leg before rotating back into the heel of the lead leg. Although you start on the balls of your feet in the set-up position, you really swing from the heels throughout the backswing and the downswing into impact. When you’re wearing tennis shoes that push your weight more toward your toes, you can’t swing the club nearly as forcefully as you can if you’re swinging with proper weight distribution. When someone wears their tennis shoes, you’ll see their head move forward into their toes, and then they back up away from the golf ball during the swing.
August 14, 2025
The hard truth is that the average golfer plays for years and never improves. But why? With input from many of my instructor friends, we’ve drawn up a list of the 12 reasons why you may not be getting better. 1. You never practice You know that whole 10 thousand hours thing? How it takes at least that long to master a skill? Do the math. Ten minutes once a month isn’t going to get you there. 2. You practice unproductively Smacking drivers on the range until you’re blue in the face might give you a backache. But it’s not going to get you where you want to go. What you need to do is practice with a purpose. Go to the range to get better at one thing, posture for example. Once you’ve spent 30 minutes working on that and incorporating into your swing, leave the range. 3. Your equipment isn’t optimized That includes your golf ball, we recommends getting your entire arsenal checked at least once a year. 4. You’ve got the wrong mix of clubs News flash. You’ve got no business carrying a two-iron. You’re also probably not good enough to have more wedges than hybrids in your bag. So don’t. 5. You don’t track your stats You think you’re a great putter, and a middling driver. But are you really? Without knowing for sure, you can’t maximize your practice time, much less devise an optimal on-course strategy. 6. You’re not as good as you think you are Two-twenty over water is not in your wheelhouse, but you always try it, because, well, your weakness is your fondness for the hero shot. 7. You’re too hard on yourself On approach shots from 150 yards, the average Tour pro leave is 23 feet from the pin. But you somehow believe you should be knocking down the flagstick, so you berate yourself every time you don’t. 8. You ride a cart You think you’re saving energy. What you’re really doing is losing touch with the natural rhythms of the game. Walk when you can. 9. You think there’s a quick-fix In a world filled with swing tips, you believe there’s a magic one that will solve all your problems. So you search, and search. You might as well be trying to track down Sasquatch. The tough news is it comes down to working on good principles long enough for them to become habits. 10. You’re don’t hit it far enough Sorry, but size matters. A good way to get better is to swing the club the faster to hit the ball longer. Any good coach can correct crooked, but getting the ball to go farther is a tougher task. 11. You focus more on words than feel You’ve gotten a lot of verbal instruction. But, words don’t translate as well to performance. Pay more attention to images and feels. It will free up your mind. And your swing. 12. Play the appropriate tee box I know, all your buddies play from the blues, but you’re a 20+ handicap. Not only do you have NO business playing from the far tee boxes but it hurts your game as the course sets up completely different for you now. Put your ego aside and have fun!
August 13, 2025
You go into a golf store, pick up a putter that "feels" good, hit a few putts on a small putting green and like the way the putter swings, and decide this putter is the one for you. Is this the best way to create a long-term, mutually beneficial relationship with a putter? Your Putter Should Be Good To You From this day forward, start your new putter relationship with a True Putter Fitting. In a True Putter Fitting, your goal is to be fit for a putter that: Has an appropriate Length and Lie Angle so that you can comfortably set up for your putts with your eyes directly over the ball or just inside of the ball at address. You can aim inside the hole from a minimum of 6 feet away. Few people realize that individual golfers "react" differently to various putter styles in terms of Aim. Edel Golf has found that more than 80% of golfers cannot accurately aim their present putter at the hole from 6 feet away. Find a custom putter fitter who can test your putter aim with a Laser. Has a Weight and Weight Distribution that allows you to control Speed with a Smooth Stroke. Be tested for Speed Control by hitting putts of about 12 to 15 feet, and then find the total putter weight and weight feel that gives you consistent Speed Control. Has a Putter Loft that will allow you - with your stroke - to roll the ball with Topspin. In the past it was believed that "standard" putter lofts should be 4 degrees. However, recent testing shows that for most golfers 2 to 3 degrees of Loft is best to create putting topspin. Has a Face Balance design that fits your personal putting stroke. Face-balanced putters tend to be better for golfers with less putter-head rotation in their strokes, putters with toe hang tend to be better for golfers with more rotation. Be tested with putters having both types of balance. Don't Break That Bond Your custom fit putter will be one you can aim well, will allow you to control the speed on all of your putts, and will feel good to putt with. This is a good start - but THAT IS NOT ALL. Zach Johnson, one of the stars on the PGA Tour, has used the same putter for 12 years - and has also used the same practice drills to continually improve his putting during that time. If you stick with a putter that fits you and you are confident with and find some practice drills you can perform to continually improve your putting - who knows how much you can improve! No more putter "one night stands" for you! The Situation: You do not understand the true benefits of custom putter fitting for your golf game. The Solution: Learn and understand the benefits of being custom fit for your next putter. Find a custom putter fitter who will fit you into a putter that has the right length, lie angle, loft, weight distribution, and face-balanced design - to allow you to create perfect aim and speed control in your putting stroke. Stick with that putter, and practice to continually improve your putting results and putting confidence.
By Daniel Guest August 12, 2025
Do you have a Pre-Shot Routine? Do you know it? Do you do it each and every time you strike a golf ball, even during practice? So many golfers have a Pre-Shot Routine for “some” or “most” of their golf shots but don't even know what their actual routine is when I ask them in a lesson. A preshot routing is essential if we want to be consistent on the course. We don't want to be the golfer who makes a swing, hits a great shot, it finally feels right and we have no record of what we just did? Unfortunately, without a good Pre-Shot Routine it may never feel right, opening the door for tension and anxiety to creep into our game, and as we all know, tension and anxiety are the killers of both your Golf game and life itself. While a preshot routing can’t keep you from that occasional chunk, duff or thin shot it can reduce the likelihood of hitting another poor shot by almost 50%. For that reason alone the average golfer should employ a solid preshot routine! Now, let's find a Pre-Shot Routine that we like, understand and rely on when it is time to make the swing. Understanding your Pre-Shot Routine will really help to keep the tension and anxiety levels way down and bring a constancy to your game. Watch the professionals on TV and you will see that they ALL have a solid Pre-Shot Routine. At Imagen Golf we have videos of Tiger Woods going through his Pre-Shot Routine in 1997, 2001, 2006 & 2016 and today and in all the swings he made his Pre-Shot Routine never changed. It continues to be simple and consistent. Some will tell you that Pre-Shot Routine involves selection of a club, checking the wind etc....and that is not wrong at all. For me though, it is after those other decisions have been made, and now it is time to execute the shot. Here is My Pre-Shot Routine: It starts about 10 ft. behind the ball behind the ball, looking down the line of play to get a visual for the shot I’m going to make. I’m standing perpendicular to the line of play, facing the shot line, I make 1 good practice swing, if it’s a poor practice swing I’ll take another as I’m looking to feel the swing that I want to make for that shot. I step into the ball from the left, (I’m right handed) now I am behind the ball, with arms hanging low and trying to get as loose and relaxed as possible. I line the clubface up with my line or target with my bottom hand, my feet start together ball right in the middle of them, and I then take my stance from there, feet are about shoulder width apart. I take my grip, a waggle of the club and I’m set. I now look back down the course to bring my line of play in, and pick a spot 3-5 ft. in front of me on that line. I am now staring at the spot. Now that I am in a good set-up position, confident and set all I have to do is make my swing. All of this happens in less than 2 minutes. Balanced Finish: Because my body & mind are set with this routine, tension and anxiety are kept as low a level as possible giving me the opportunity to execute the best possible swing. Study the professionals; watch for their Pre-Shot Routine and re-evaluate yours. Find a style that fits your game and practice it on the range. Remember, it is important to know and execute your Pre-Shot Routine every shot so that you will be prepared to make the best possible swing for the shot at hand.
By Daniel Guest August 12, 2025
In a recent interview, Dustin Johnson revealed his practice habits and stated that he spends 80% of his practice time working on his wedges. Scoring comes down to how well you handle the shots from 100 yards and in. The more you practice chipping and pitching, the more confidence you'll gain in your ability to control the distance and land the ball on the green where you want it to. Start with this sample plan to break up your practice time and start seeing results in your golf game. Assume a 2 hour practice time slot: Spend 5 minutes hitting iron shots with your 7,6,5 irons to warm up Spend 10 minutes hitting balls with your driver and woods, shaping different shots Spend 15 minutes hitting wedge shots with a half swing, controlling distance Spend 15 minutes hitting wedge shots with a full swing, controlling distance Spend 15 minutes hitting wedge shots with a max swing, controlling distance Spend 15 minutes hitting wedge shots with a 3/4 swing, controlling distance Spend 30 minutes working on 6-8 foot putts Spend the last 15 minutes working on lag putts (30+ feet away) I promise you if you focus on this style of practice, you're going to see your wedge play get much better. And the times you screw up a lag putt or chip shot, leaving yourself 6-8 feet short of the hole, you'll feel confident putting and sink more putts to save par. Sign up for one of our Short Game Lessons Today!!!
By Daniel Guest August 12, 2025
We all know that short game is where the scoring happens in golf, yet many golfers spend too much focus on their driver. Today, we want you to forget about your golf swing and just focus on your chipping and putting skills. By improving your short game, you will see your golf scores get lower. It’s a fact. We compiled 10 challenging and fun short game drills for you to attempt different days at practice. To add pressure to yourself, keep track of your scores and try to beat your own records each time you attempt these short game drills. Plus, we received many requests to create a practice plan that is short game focused and doesn't take too long to practice so we've built a short game challenge with 10 Levels to pass you can learn more about here. 10 Short Game Drills for Improving Quicker The One Legged Chip When it comes to good chipping technique, you don’t want to move your weight around during the shot. By keeping your weight forward on your lead leg, you’ll make more crisp and consistent contact with the ball. To ensure you get comfortable chipping with your weight remaining still, try the one legged chip shot to improve your short game. The Steps to Follow: Take a narrow stance Put most of your weight on your front foot Lift your rear foot off the ground and let the toe rest on the ground Perform the chip shot 15 Points Chipping Game For this short game drill, you’ll need to grab 5 golf balls. Then select a location around the practice green to chip from. Pick 3 holes you think would be considered easy, medium, and difficult to chip to. Chip all 5 balls to the easy hole first and record how many you can get within 5 feet of the cup. Each successful chip to inside 5 feet scores a point. Repeat this for the medium difficulty and hard difficulty locations, tracking your score. Then add up your 15 chips and see how you scored out of 15. If you can get 10 or above you’re doing well! 3-2-1 Chip In Drill This short game drill can take 10 minutes or it could take an hour! You could even make an entire golf practice session out of it. To start, grab 3 golf balls and drop them somewhere 4-10 yards away from the practice green, giving yourself a few yards of carry distance before the ball makes it to the green. Select a hole to chip all 3 balls to and try to chip them in. Once you chip in a ball, get rid of it so that now you’re down to 2 balls. Continue this drill until you chip in the second ball and remove it so that you’re down to one ball. Finally, once you chip in the 3rd and final ball, you’ve completed this drill. Make sure you’re moving around each time to different holes and different distances away from the edge of the green. Par 18 Putting Game This short game drill will challenge your putting skills and help you learn to handle pressure. Follow these steps: Grab 9 golf balls Pick 3 easy putts, 3 medium difficult putts, and 3 hard putts Place your 9 balls at each of these locations you just picked out Give yourself 2 putts per location and see if you can score 18 or lower Try to beat your score each time to add a little pressure to your game. The best score you can get is 9 if you one putt everything and the average score is 18 if you 2 putt everything. So try to get 18 your first time playing this game and then work down from there aiming for 17, 16, 15, and so on. Up & Down Ladder Drill An up and down is when you successfully chip a ball onto the green and sink the following putt on the first try. No two putts. So in this short game drill you’re going to be selecting 3 holes to use for up and down attempts. Pick one hole that is 20 feet away, another hole 40 feet away, and lastly a hole that is 60-80 feet away. Start by chipping to the short distance hole, then the medium distance, and then the far distance hole. Convert all 3 up and downs in a row. Then reverse it by chipping to the far hole, then the middle hole, then the closest hole and making all 3 up and downs in a row. Start over each time you fail to make them all in the correct order. 5 Ball Circle Putting Drill This is a classic putting drill to build up your skills from all angles around the hole as well as build your mental toughness to perform under pressure. Start off 3 feet away from the hole and work back to 4 feet, 5 feet, 6 feet and so on as you pass each level. The Drill Set Up: Pick 5 spots around the hole in a circle and place tees in the ground to mark the spot. Set one ball at each of the 5 locations. Move around the circle trying to make all 5 balls in a row to complete that level. Then move back to the next distance and repeat. Beat the Previous Chip Drill Here is a chipping drill that will place pressure on you and build your short game mental toughness. Start off by measuring a 5 foot radius around the hole, marking different angles around the hole with ball markers. Now that you’ve created a ring around the hole with a 5 foot radius, you’ll need to: Grab 2 golf balls from your bag Pick a location to chip from Get the first chip inside that 5 foot ring (leaving yourself a putt of 5 feet or less) Then try to get the second chip closer than the first chip If the first chip fails to get within 5 feet, go grab it and restart. Only once the first chip is inside 5 feet will you be allowed to attempt the second chip. It’s a very challenging but fun drill. Start off with a hole that is closer to you and once you pass the drill, move to another hole further away or that is more challenging. One Handed Lag Putts Another area of the short game that shouldn’t be neglected is putting from long distances, also known as lag putting. Therefore, the next two short game drills will focus on building your lag putting skills to help you stop 3 putts! Measure out distances of 30 feet, 40 feet, 50 feet, 60 feet, and 70 feet from a hole of your choice on the practice green. Place one golf ball at each spot you measured and marked, giving you a total of 5 different putts of varying distances. Attempt to hit each of these lag putts with just one hand on the putter. If it helps, place the other hand behind your back or in your pocket. The goal would be to get all 5 putts within 4 feet or less of the hole, leaving yourself easy tap in putts. Beat the Previous Lag Putt Drill Similar to the chipping drill above, this putting drill tests your speed control and places pressure on you to hit each putt closer than the previous putt. Measure out 5 different distances again for lag putts (far away putts) from 30-90 feet away from the hole. You choose the 5 distances between this range. (Ex: 35 feet, 50 feet, 65 feet, 75 feet, 80 feet) Place a ball at each of the 5 distances. Start at the furthest away distance and try to get it within 6 feet of the hole. Then try to get each of the following putts even closer than the previous putt. It challenges you to control your putting distance so that you leave yourself room for each following putt to beat the previous. If you make the first putt from 80 feet away, you can’t really beat that! 300 Putt Challenge Our 10th and final short game drill is a high volume rep drill to build your putting skills from 6 feet and in since this is a critical distance you’ll face often. Start off on day 1 by making 100 putts from 2 feet, 3 feet, and 4 feet away from the hole. Day 2, move back one foot. Make 100 putts from 3 feet, 4 feet, and 5 feet. Day 3, move back one foot. Make 100 putts from 4 feet, 5 feet, and 6 feet. Continue working your way back if you’d like until you’re making 100 putts from 8 feet, 9 feet, and 10 feet. Ideally, your focus should be on that 5 feet to 7 feet range since these are very common when you don’t hit the best chip shot or best lag putt. That's it, let me know your thoughts? See you on the links!!!
By Daniel Guest August 12, 2025
Instructions: From your hands and knees position, place one knee across your body --- up and over toward your opposite hand. Lift and cross your other knee over the foot of your crossed under leg. Drop down to your elbows and slowly slide your straight leg back until you feel a comfortable stretch in the back of your bent and crossed under hip (Picture A). Hold this gentle stretch position for 10 full swing visualizations – OR – until you feel a complete melting/softening of the initial stretch in the back of your hip. When you are ready to increase the stretch, slide your leg farther back and/or reach your arms out in front, lower your chest and head to the floor (Picture B). Repeat 1-3 times per day for both legs as needed. Purpose: Releases tightness in the front and back and outer portions of your hips. Improves your hip rotation mobility. Reduces strain and injury potential in your lower back, hips, knees and ankles during the complete golf swing. Improves your ability to maintain a stable foundation (quiet legs) during your backswing, and a complete, unrestricted hip rotation during your follow-through.
By Daniel Guest August 12, 2025
Instructions: Lie on your side with both hips and knees bent to the 90°/90° position, a pillow/towel stack between your knees, and a pillow supporting your head and neck. Place both hands together in front of your chest (Picture A). Inhale, then, slowly exhale as you rotate your upper torso back and reach one arm behind you as far as possible. As you rotate, be sure to maintaining a stable pelvis, hips and leg position, until you feel a comfortable stretch in your chest, shoulder, spine and/or hips regions (Picture B). Hold this gentle stretch position for one full swing visualization – OR – until you feel a complete melting/softening of the initial stretch. As the stretch feeling gradually releases, you may be able to rotate your upper torso back farther into a new stretch position. You may also perform this same stretch by placing one hand behind your neck and then rotate back. Repeat 1-3 times per day for both sides as needed. Purpose: Releases tightness in your chest, shoulder, spine and hips. Improves rotation mobility potential in your spine and hips during the full golf swing. Reduces strain and injury potential in your spine, hips and shoulders during the complete golf swing.
By Daniel Guest August 12, 2025
In many ways, golf is a confusing game. Want to make the ball curve to the right? Swing to the left. Want to make the ball fly high up into the air? Swing down through the shot. You get the idea. Nothing is straightforward in golf – it seems that everything is the opposite of what you would expect. The same can be said for power and distance. Want to hit the ball impressive distances with each club in your bag? Learn how to swing ‘slower.’ That’s right – if you want to hit the ball farther, you are going to need to learn how to swing “slow” (or more specifically, “controlled”) and easy while maximizing your swing speed at the moment that matters most. Don’t worry if that doesn’t make a lot of sense right away – this is a concept that many golfers never manage to grasp. The Only Moment That Matters For all of the work that is put into your golf swing, your club is only touching the ball for just a fraction of a second during each swing. Impact lasts for just the blink of an eye, as the club face slams into the back of the ball and sends it rocketing off into the distance. Despite this fact, most golfers try to make their entire swing fast, not just the moment of impact. Unfortunately, this is a mistake. There can only be one fastest point in your swing, and if you are trying to swing quickly, that moment is not going to be at impact. https://youtu.be/w-UmefMZfnA The Pros Do It Right If there is one specific thing that is frustrating about watching golf on TV it’s the ability of touring professional golfers to hit the ball incredible distances with seemingly very little effort. You have certainly seen it for yourself – a pro golfer makes a swing that looks totally effortless, and yet the ball explodes into the sky and doesn’t come down for more than 300 yards. How do they do it? Is it the equipment? What’s their secret? The ‘secret,’ if there is one, is that pro golfers don’t waste swing speed like amateurs do. The average amateur player hits their maximum swing speed well before the club ever reaches the ball, meaning that the club head is actually in the process of slowing down when impact occurs. On the other hand, the typical pro is a master of reaching top swing speed at the perfect moment. They key to this is largely how the pros swing in the proper ‘sequence,’ that being how they start their downswing with the bottom (legs) and then move that motion up toward the top (shoulders and arms). When many beginner golfers try to swing ‘fast’ the result is an attempt to move the hands and arms too quickly which causes the upper body to get ahead of the lower body – this is often referred to as ‘getting quick at the top.’ While this motion feels intuitively as though more swing speed is being generated the opposite is actually true. https://youtu.be/xS-uy7VYIGw There’s No Need to Rush When you stand over the golf ball preparing to hit a shot, you need to understand that there is no rush to complete the swing. Sure, you don’t want to take so long preparing for a shot that you hold up the pace of play, but the actually swinging motion itself can take its time to develop. The ball isn’t going to roll away – so start slow and build up to a powerful strike. There are two key points in the golf swing where amateur golfers are prone to rushing. The first is the takeaway. Many players snatch the club away from the ball when they start the swing, setting the stage for a swing that will be rushed from start to finish. A quick takeaway means that your body will not have time to get into the right position to support a powerful downswing move. The other danger point in the golf swing is the transition. This is likely the number one culprit when it comes to amateur players rushing through the golf swing. As soon as the backswing finishes, many players decide that they need to take the club down to the ball as fast as humanly possible. Rather than getting their legs involved to develop real power, these players simply throw their hands down toward the ball and slap at it with an arms-only swing. Not surprisingly, the results are consistently disappointing. Rushing the swing, whether in the takeaway or at the top, is always going to lead to weak contact and below average shots. Even Tempo and Lower Body Power No one part of your swing should look rushed or hurried when compared to the rest. This is why the professionals are able to make swings that look so effortless – they don’t hurry at any point . The best swings are the ones that build gradually from start to finish, with a steady acceleration of the club occurring from the top down into impact. To maximize your power by accelerating the club all the way through impact, you need to use your lower body correctly from the top of the swing. As soon as the backswing is finished, your legs should take over the job of turning your entire body toward the target. It is essential that your legs are the first thing to fire from the top – if your hands and arms win this race, you will be destined to create a weak downswing. Use an even tempo and hold your arms and hands back while your legs initiate the action. If you can do this correctly, the effortless power seen in the swings of professional golfers may soon start to appear in your own game. Pro golfers are actually trying very hard to create power, despite the appearance that their swings are slow and effortless. However, since they understand the correct techniques and mechanics involved in developing power, their swings have a beautiful appearance which the envy of amateur golfers everywhere. You can’t hit the ball 300 yards without generating a good amount of club head speed, and you can be sure that the pros are actually swinging very fast – only they are swinging fast at the perfect moment in the swing, not all the way through the swing. Master your tempo and timing to max out swing speed at the bottom if you want to follow the lead of your favorite tour professional – your swing may ‘look’ slower to the casual observer but you’ll know that your only applying your max speed at the only moment that really matters…IMPACT! Additional Resources Check out this video by Paul Wilson Golf Instruction for more excellent drills you can do to create that effortless, slow, and easy golf swing you’ve been looking for. https://youtu.be/rFxh7hhXwjI Recommended Further Reading Here are a few staff favorite books on the subject of creating an effortless golf swing that we recommend checking out: The Keys to the Effortless Golf Swing by Michael McTeigue Ben Hogan’s Five Lessons by Ben Hogan